 Eastmans' Official Blog | Mule Deer, Antelope, Elk Hunting and Bowhunting Magazine | Eastmans' Hunting Journals

When I was younger, my hunting strategy was very simple – run around the mountains as far and as fast as possible and shoot anything dumb enough to cross my path. Wow, have I come a long way. This system was not in the least bit effective, not to even mention being very unenjoyable and unrelaxing. Who knows how many bucks and bulls I walked past back in those days. Now, as I get a little older and wiser, I understand there is a much better way. Here are some of the strategies I have found useful to not only extend my hunt and travel further, but to enjoy my hunt and the overall experience just a little bit more in the process.
Hydration Strategies
There’s really no big secret strategy here. The name of the game when hiking hard is to keep properly hydrated by loading your body with fluid and keeping it there. My personal strategy here has a two-edged approach. First off, I try to drink as much fluid as possible before the hike even begins. Sometimes I even guzzle down a full half liter of water about a half-hour before go time, generally first thing in the morning or on the way to the trailhead. You will want to give your liquid a bit of time to settle in which will alleviate the possibilities for “sloshing” while hiking. It takes about 15-30 minutes for your body to fully absorb that quantity of moisture once ingested. This process is called “cameling up.” The process is pretty straightforward and will ensure you don’t start out your trek with a hydration deficit. A few things to remember here, cold water digests more slowly and supplements and water additives can also affect the time it takes your body to absorb the water. Your body can go from a moderate level of dehydration to fully hydrated in about 45 minutes. Even under the most strenuous physical activity such as a marathon, your body can only fully absorb about 500 ml (1/2 liter) of water per hour, so drinking more is usually a waste of water and energy. In addition, once you have hydrated after a strenuous climb, always give yourself at least five minutes before you consume food or supplements of any kind. Not doing so will only prolong your dehydration. I usually drink pure water, ½ liter before and after a tough climb, but I drink water with a supplement with my food consumption. Many supplements contain fairly high levels of sodium or sodium-like elements which your body does need, but can affect or alter the rate of absorption of the water into your body tissue.
Moisture Management
The second part of my strategy is what I call the science of moisture management. Essentially, I try to do my best to keep as much moisture as possible inside my body while hiking and climbing. The best strategy I have found is to do your best not to sweat all of your moisture out into your clothing as you climb. The easiest way to accomplish this is to do your best to take your time. Low and slow, I call it. The tortoise always wins the race every time I read the book. A few tips on this method are very simple and straightforward. Try to leave your heavy hiking for the cooler hours if possible, before 9 am and after 5 pm. Start plenty early and give yourself extra time. Do your best not to get behind the eight ball, so to speak, with a rising or setting sun. Get where you need to be way ahead of time.
Racing the rising sun to the top of a steep ridge can be a very exhausting and hydration-wasting experience. Dress down – most of us start out the day over-layered. I always tell myself you should be slightly cold before you start. I have begun way too many hikes with layers that have put me at a good comfort level while standing around camp but once I start hiking, those layers turn on the heat and by the time I overcome my stubborn streak and layer down, it’s already too late. Once I get into the hike and things start to get heavy, I try to monitor my sweat levels. If I think I’m getting too hot, I either slow my pace or take a break in the shade or in a cool, shady spot with a breeze. This can be a great time to get some glassing in. So many times, have I found a buck or bull laying underneath a rim or tree line that I would have otherwise never seen or even walked past without this low and slow method. Incorporate plenty of layers and don’t be afraid to take them on and off throughout the day. We’ve sometimes layered up and down nearly 20 times in a single day as the temps and weather changed; some of the things sheep hunting will teach you, I guess. Now, let’s chat a little bit more about layers.

Layering Theories
When we talk about layering theory, we want to focus on three things: heat retention, breathability, or moisture dynamics, and elemental protection. Like most things in life, there is almost always more than one way to skin a cat and building a quality layering system is no different in that regard. I personally use a five-layer system for top and a three-layer system for bottom.
Let’s start with the bottom. When it comes to layering in general, it’s almost always more efficient and effective to have more lighter layers than it is to have fewer and heavier layers. There is no one size fits all when it comes to layering pieces. I have found that hunting with a light merino base bottom and a lighter pant is more comfortable, effective and versatile than simply hunting in a heavy pant. That said, my go to hunt system is a mid-weight pant, and a merino base bottom with a high quality breathable set of rain pants in my backpack. Many a ridgetop has seen me in my underwear layering up or down from my merino wool base. The high-quality rain gear is probably the most critical piece of gear, in my opinion. The key here, for both top and bottom, is the highest quality fabric you can afford. A high-quality Gore-Tex or a Schoeller fabric are the best textiles available on the market today, but they can be very expensive. For true elemental protection from the rain and wind this layer is not only critical, it can become a major factor in survival under extreme circumstances.
For my top layers, I use a double base layer system to start with. A very lightweight synthetic T-shirt, long or short sleeve, is where I begin for the against-the-skin layer. This is usually the layer I do most of my midday hiking in. This is the first point of contact for the moisture leaving my skin, so a quick-drying, moisture-wicking material is best here. My next layer is my merino base, the sister piece to my merino base bottom. A quarter-zip long sleeve mid-weight base is perfect here. This layer is designed by nature to suck up the excess moisture from my synthetic T-shirt and keep the sweat one layer beyond my skin. Merino wool is very good at pulling moisture from the layer below and holding it until it can be moved to the next layer if there is one, or until it evaporates out into the atmosphere. A slight breeze can put the evaporation properties of merino into overdrive, all with minimal odor. The next layer on my top is a mid-level fleece or synthetic of some sort. A jacket or performance hoody is usually best here. This is the layer I do most of my actual hunting and stalking in. The next two layers are my insulation layer and my protective layer, which usually stay in my pack until necessity demands due to either falling temps, rain, snow or heavy wind, and maybe all three. The insulation layer is usually a high-quality down or down-equivalent vest or puffy jacket. Treat this layer like it’s made of sugar. Do your absolute best to not drench it. The protective layer, which we already talked about earlier, is basically my raingear and is used to keep my system dry and acts as a wind barrier as well. This layer is your climate armor and the best place to spend the lion’s share of your budget.
A few quick notes regarding your layering system. Buy the best you can afford and often times, a mixture of different manufacturers might be the best option for you when it comes to fit, performance and affordability. That said, most of the top clothing companies now are developing and producing full layering systems that are engineered to work together, not only in fit, but in moisture management as well. I always sleep with my clothing in the tent with me. I almost never leave my clothes in my pack or outside. Most of the fabrics used for these garments perform best when relatively dry. When backpack hunting, I usually carry a spare dry set of socks, underwear and T-shirt. You just never know what might happen. When climbing, I layer down as much as possible. If I do happen to sweat out a piece of clothing, I usually strap it to the outside of my pack as long as it’s not raining. This helps it to dry faster than it would stuffed into the bottom of a backpack pocket. Not to mention it helps with odor control.
Final Thoughts
We have already hit on this a little bit in previous sections. The key here is low and slow. Try to keep your system as light as possible, carry plenty of moisture on board and pick your route wisely. Sometimes the steepest, fastest way to get to the top is not the best way. Conserve your energy and manage that moisture output. Sometimes I even have to make myself slow down or even stop. It’s human nature, we often want to just get it over with, straight to the ridgeline, no stops and start hunting. If you spend any time in a sheep camp you will quickly realize that low and slow is a very effective way to hunt. Hunting’s not about speed and haste, it’s about patience and skill.
When choosing a route, I try to pick the path of least resistance and plan good places to stop, grab a snack and hydrate ahead of time. When the going gets rough and really tough, try counting your steps. Take 20-30 steps, then rest for a few minutes, then take 20-30 more. The counting can take your mind off the pain. Do your best to keep blisters at bay. I will often take my boots off and let my feet breath and dry out while eating lunch or taking an extended break. A fresh pair of socks can sometimes be a God-send here. I usually hunt with high-quality insoles in my boots such as the Kenetrek supportive insoles. For some strange reason, even the high-end boot manufactures often use cheap thin rubber insoles in their boots, a recipe for blister disaster for me. Get to know your feet. Every foot is different, even on the same human. Get to know yours. Trial and error is usually the only way here.
There’s a saying in hunting that patience kills, and I can attest that is in fact generally true. When it comes to backcountry mobility, slow and steady often also means quiet, which can be a very solid route to a kill. Silence is just another form of patience really and is a virtue that we as hunters are constantly trying to master in an effort to perfect our craft. A good layering system, a solid moisture management plan and effective mobility skills can put you on the route to your next kill, all while not killing yourself in the process.


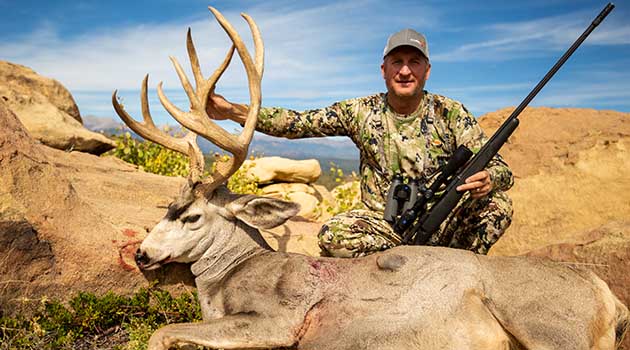
Hey Mike, that is a monster mule deer accompanying your article. But what I want to say is: dude that barrel on your rifle looks in the picture like it’s a mile long!