 Eastmans' Official Blog | Mule Deer, Antelope, Elk Hunting and Bowhunting Magazine | Eastmans' Hunting Journals
Setting up a bull elk and hunter for photos is one of the hardest harvest photos to pull off. The secret to a quality trophy photo is all in where the viewer’s eye goes to first. So let’s talk about what setup would not only highlight the trophy bull but also put you, the hunter, in a pleasing position.
To start with, I evaluate what is most impressive on the bull’s rack. Maybe he has long back tines or a whale-tail main beam. Then I will try and use that as the focal point of the shoot, moving the beams around until that impressive attribute of the antler is well displayed in the photo. In rare occasion the bull’s rack will have several outstanding features so maybe two totally different setups are photographed, then later the best is chosen for display on the wall.
Before setting up the body position of the bull you need to evaluate the sun’s position in the sky. This is the one element of taking a great harvest photo that the best setup can lack. You end up with shadows, washed out or flat-looking photos. Remember to always have the light to the cameraman’s back and shining on the subject. You can get away with having cross-lighting but you will get some shadows and then the use of a flash is need.
The background is also very important. Use it to accent the animal and hunter. Remember, the purpose of the background isn’t to camouflage the hunter or his trophy. Trees or bushes will fight with the subject and aren’t conducive to an excellent harvest photo. Try shooting at a high f-stop like f2 or f4, which will blur the background and make the subjects pop out in the photo.
The best light for photos is morning sun. Without good sun, a great setup just becomes a dull photo. The background needs to be sky or something that will not compete with the subject and its antlers or horns. Having white clouds behind the animal and hunter isn’t all that bad. Anything with a simple and somewhat unobstructed background will help from disguising the horns or antlers.
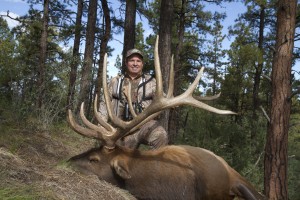
Generally, there are three setup positions that can be arranged in the field: The first position is having the animal highlighted more prominently. This is achieved by positioning your head well below the top of the antlers or horns (photo A). The second position is where the hunter wants to be the focal point of the photo. With this setup, your head is higher than the tops of the antlers or horns (photo B). The third position is where you and the animal have equal billing in the photo by having your head the same height as the antlers or horns (photo C). Usually the best trophy setup is (photo A), having the animal highlighted more prominently.


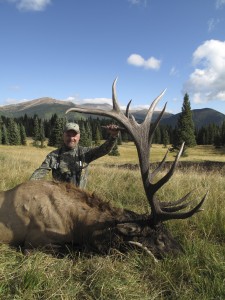
Basically, you have two positions for the antlers to be displayed. The first antler option is placing the beams horizontal above the body (photo D). The second option is to push the beams straight vertical or slightly angled up into the air (photo E).
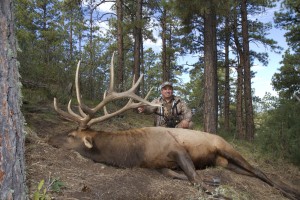
In the photos where the antlers are horizontal or vertical make sure that a tine isn’t crossing in front of the face or body of the hunter. So place the hunter either between the tines on the backside of the body, or you might have to have him positioned at the back of the body behind the main beams. It all depends on the configuration of the tines with respect to the length of the main beams. I usually will do a photo shoot with all three antler positions, later looking at them on the computer to evaluate the hunter and antlers for the most impressive trophy shot.
Just remember that usually if the scene is well set up you will get several different photo views that are worth saving and using. Remember, it doesn’t take any longer to arrange a great photo setup than a bad one. Good luck hunting and photographing.


Great info Mike! Do you have any suggestions for solo hunters trying to take pictures with a self timer? I carry a nikon coolpix P5100 because of its compact nature and ability to digiscope on my compact nikon spotting scope. Unfortunately the longest delay is 10 seconds. By the time I run and get into position there is little time for adjustment of the pose. Getting a good shot solo can take an hour of running back and forth to the camera and the animal, and must be done before meat processing can begin. When an animal is killed in the evening you often fight the onset of darkness ruining photo quality as well as pushing the processing job well into the wee hours of the morning.
Brian
Brian,
I use a Cannon Powershot camera in the field. It’s longest delay is 30 seconds, which allows you more time to get into position. It will take up 10 shots in sequence. Using this setup you can move the horns, your body, change your expression etc. Then you go back to the camera, look at the shots you just took and take some more if your not happy with your results. I usually take 100 or more and end up with 4 or 5 that are great. In fact, every season I have someone ask who my photographer was. I use this technique when I’m alone and hunting with friends. It allows all of us to be in the shot. Anymore, the photos mean more to me than a mount!
Tom Cook